Understanding 5.1 Surround Sound Formats for DCP Creation
When preparing Digital Cinema Packages (DCPs) and other professional deliverables, you’ll encounter 5.1 surround sound in three primary formats:
- Interleaved 5.1 WAV File
• Single file containing all six audio channels - Container Files (QuickTime/MXF)
• Video file with embedded audio
• May contain either:- Complete 5.1 surround mix
- Combination of stereo and 5.1 tracks. Often a Music and effects 5.1 track in stereo and 5.1.Then a full mix in stereo and 5.1
- Discrete Mono Files
• Six separate audio files (L, R, C, LFE, Ls, Rs)
• Common in professional mixing environments
• Requires proper channel mapping
Working with 5.1 Audio in DaVinci Resolve
I’ll guide you through importing each format into a 5.1 track in DaVinci Resolve, ensuring proper setup for both DCP and ProRes deliverables. This workflow allows you to:
• Maintain professional audio standards and avoid using the bus
• run loudness checks in Resolve on the 5.1 track
Creating a 5.1 Surround Sound Track in DaVinci Resolve
The 5.1 surround sound format is the industry standard for DCPs (Digital Cinema Packages) and ProRes deliverables. Here’s how to set up a proper 5.1 track:
Step 1: Configure Track Type
- Locate your existing audio track in the timeline
- Right-click on the current track format indicator (showing either “2.0” for stereo or “1.0” for mono)
- Navigate to “Change Track Type”
- Select “5.1 – 5.1” from the dropdown menu
Important Notes:
- Choose standard “5.1” rather than “5.1 Film” . 5.1 Film is the channel mapping often used in Pro Tools
- The “5.1” format follows the standard DCP channel order:
- Left (L)
- Right (R)
- Center (C)
- LFE (Low-Frequency Effects)
- Left Surround (Ls)
- Right Surround (Rs)

Importing Discrete Audio Files as 5.1 Surround Sound in DaVinci Resolve 18.6+
DaVinci Resolve 18.6 introduces a streamlined method for handling discrete audio files in 5.1 surround sound. Here’s how to properly import and manage separate mono tracks as a unified 5.1 audio file.
File Naming Convention
Your six mono audio files must follow this specific naming pattern:
- sound.L.wav (Left)
- sound.R.wav (Right)
- sound.C.wav (Center)
- sound.LFE.wav (Low-Frequency Effects)
- sound.Ls.wav (Left Surround)
- sound.Rs.wav (Right Surround)
Import Process:
- Ensure all six files follow the correct naming convention
- Drag all files simultaneously into the Media Pool
- Resolve automatically recognizes them as a single 5.1 audio package
Advantages:
- Simplified workflow compared to previous versions
- Automatic channel mapping
- Functions identically to other 5.1 formats:
- Interleaved WAV files
- MXF containers
- QuickTime files
- DCP audio tracks
Pro Tip: This feature only works with exact file naming – even minor variations will prevent automatic 5.1 recognition.
“Importing Interleaved 5.1 WAV Files and DCP Audio
Working with interleaved 5.1 audio files is straightforward in DaVinci Resolve, whether they’re WAV files or from DCPs. Here’s how to properly import these professional audio formats.
Technical Requirements:
- Format: Interleaved WAV or DCP audio
- Bit Depth: 24-bit
- Sample Rate: 48 kHz
- Channel Configuration: 5.1 surround
Standard Channel Order:
- L (Left)
- R (Right)
- C (Center)
- LFE (Low-Frequency Effects)
- Ls (Left Surround)
- Rs (Right Surround)
Import Process:
- Create or select a 5.1 track in your timeline
- Drag the interleaved file directly to the 5.1 track
- Resolve automatically maps all channels correctly
Compatibility Notes:
- Works identically for both WAV and DCP audio sources
- Maintains professional audio specifications
- Preserves channel relationships
- Ensures proper synchronization
Pro Tip: Always verify channel mapping in the audio meters to confirm correct channel orientation before final export.
Configuring 5.1 Audio from MXF and QuickTime Source Files
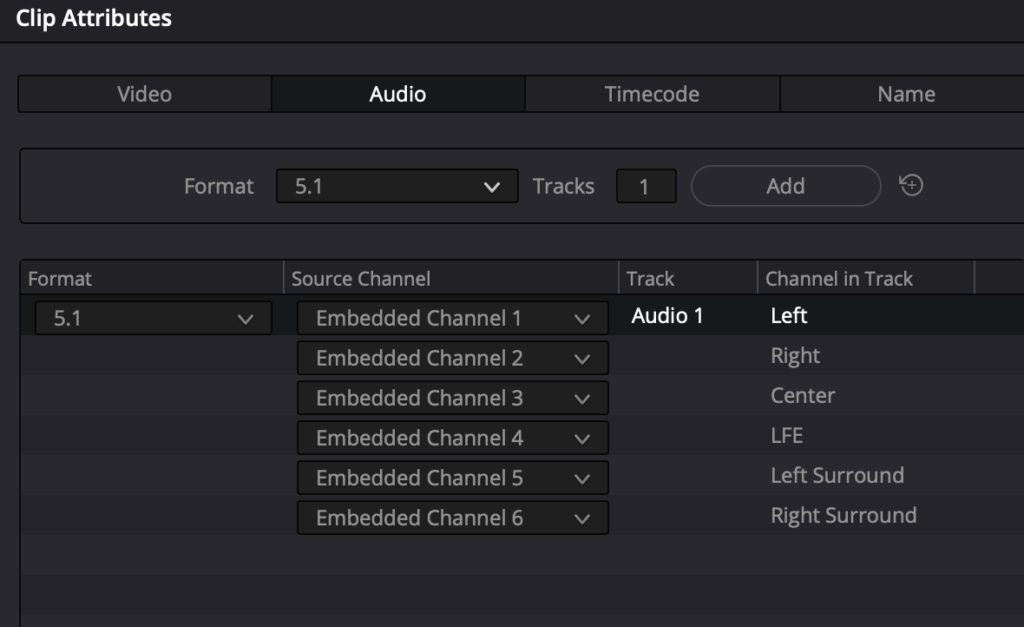
When working with MXF or QuickTime files containing 5.1 audio tracks (with or without additional stereo tracks), proper configuration in DaVinci Resolve ensures correct channel mapping.
Step-by-Step Configuration:
- Import Source File
• Add your MXF or QuickTime file to the Media Pool - Access Audio Settings
• Right-click the file in the Media Pool
• Select “Clip Attributes”
• Navigate to the “Audio” tab - Configure Audio Format
• Set “Format” to “5.1”
• Set “Tracks” to “1”
• Click “Apply” to confirm changes
Managing Multiple Audio Tracks:

- For files containing both 5.1 and stereo:
- Keep 5.1 full mix track for surround sound delivery
- Remove stereo tracks and 5.1 Music and Effects tracks that are not needed
Pro Tips:
- Always verify audio mapping in the mixer
- Check channel configuration before final export